

how to draw a lily
In this tutorial I am going to show you how to draw a lily. A calla lily to be more specific. This beautiful flower is a favourite of so many people. With its long, slender stems, beautiful look and sturdy nature, it's easy to see why.
For the beginning of this drawing, I am going to take the systematic approach, of breaking it down to the most basic shapes, and building it up from there. This approach is used by so many people from professional designers, to illustrators to hobby creatives, for its usefulness in making the simplest or most complex drawing easily accessible. I highly recommend getting familiar with this way of drawing, as it will allow anybody a vast amount of freedom in what to draw, since anything can be broken down to simple geometric shapes, and then built up from there. How much you then ornate your drawing, and the level of detail you apply is completely optional. This means you can literally draw anything!
Think about stick figures as an example… Are they a detailed, sophisticated, highly detailed piece of art? No, of course not! -Do they get the message across, in a way that most people will instantly recognize? Absolutely! Here's an example:

You start from there, and then you add as much detail as you want, and are able to. And this approach can be applied to ANYTHING ! The challenge is to identify the simple organic shapes, and that basically comes down to observational skills. I'll be diving into this, in much greater depth at a later point, but for now just be aware of the idea.
Now, Let's Explore How to Draw a Lily, Shall We?
Step one:
Draw an oval
Here's your first basic shape. Remember to draw lightly, as you'll be erasing part of it later.

Step Two:
Add a prolonged, curving shape to the bottom of it. Another very basic shape.

Step Three:
From the point where the two shapes meet, draw a line down towards the bottom.
Give it some curves along the way, and try to make it emerge as a continuation of the curve from the original oval.

Step Four:
Now turn your efforts to the top, and add a pointy triangular shape
-See how the overall shape of the flower is starting to emerge?

Step Five:
Get out your eraser, and carefully open up the oval on the bottom, and the top.

Step Six:
Now draw the left inside of the flower with a line emerging from the curvy line in the middle.

Step Seven:
Turn to the right side of where you erased part of the original oval shape, and continue that broken line.
Continue the shape upwards, making a point, and then connect it to the left side of the flower.

Step Eight:
From the pointy shape you just made, draw a curvy line on the inside of the flower.

Step Nine:
Now draw in the spadix (yes, that is what it is called 😉 ) emerging from the middle.
This is your basic flower.

Step Ten:
Draw the stem at the bottom.
Two parallel lines, with a slight curve at the top, where they meet the flower.

Step Eleven:
We're gonna add a couple of leaves to the stem. Starting with the outline.
Again I am starting with a very basic shape, that doesn't look like much. There's no depth, no detail, no life in it. All that comes after.
Notice how on each leaf, one line overlaps the stem a little bit. This is to create the illusion of the leaf wrapping around the stem. This will become much clearer. For now, just know that it's supposed to be that way. 😉

Step Twelve:
(Note: At this point you can make a choice regarding difficulty. These next two steps are a little tricky, but adds a lot of character and effect to the leaves of the flower. They can easily be skipped if you wish. In that case simply jump to step fourteen.)
Many lilies have a sort of curvy/wavy edge to the leaves. This is pretty characteristic, and a very nice feature. It also represents a nice drawing challenge. The way I chose to approach this was as follows:
On top of the lines of the leaves that I already drew, I very carefully drew another much more wavy line. One that sort of follows the shape of the first line, but still crosses back and forth across it. (It's probably easier to just look at the picture, than for me to explain it.)
The small arrows I added represent the places I need to clean up with an eraser afterwards. (Note: I actually missed two spots on the bottom part, find them in the next picture. Sorry! 😉

Step Thirteen:
This is what the leaves look like after I have cleaned it up with an eraser. For accuracy, a mechanical retractable eraser or an eraser pencil works well.
(You can find all six spots that I cleaned up, including the two I missed on the previous one, on this drawing)

Step Fourteen:
Now draw a line moving up through the middle of the two leaves, following the basic shape of the leaves.
Also erase a small piece of the stem at the very bottom of the individual leaves. This gives the impression of the leaves wrapping around the stem of the flower.

Step Fifteen:
Now draw more lines on the inside of the leaves. Have them follow the first line.
It might be a good idea to thicken the middle line a little bit, like I have done here. It will help to keep the lines "in order" so to speak.

Step Sixteen:
Now you have the outline of your flower.
At this point, it's a good idea to go over all the lines and clean them up a little bit, thickening the ones that need it. This tightens up the drawing, and gives it a nice consistent feel.

Step Seventeen:
Shading is always something that lifts a drawing quite a bit.
Here I have begun with something that Mark Kistler aptly calls "nook and cranny shading". This basically involves a fairly massive shading wherever one shape meets another. I find that this works really well, especially when the additional shading is applied afterwards.

Step Eighteen:
Some additional shading, and your flower is pretty much done! 🙂
I like to use crosshatching.
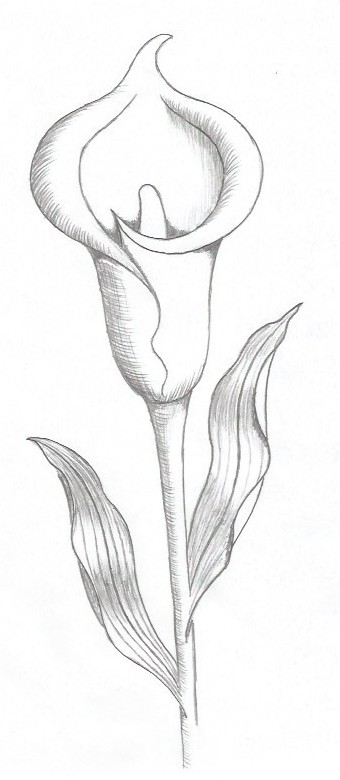
So That's it: How to Draw a Lily
There are, of course, so many different ways to go about it. This is just one approach. It's a simple one that works well, though.
An Additional Challenge
So now that you've learned how to draw a lily -a single flower- why not try to expand upon it a bit, and make it into a bouquet. Use my drawing beneath for inspiration, if you wish. As you can see, I've added a few long slender leaves in the background for effect. These are simple and work well, but of course completely optional.
Coloring
Coloring is a completely separate subject. And there really is as much to learn about coloring, as there is about drawing (yes, really!… And yes, it's a little daunting to think of! I agree wholeheartedly! 😉 )
As you can clearly see, my coloring is not particularly developed. But I would absolutely encourage you to start experimenting with it. Simple markers will take you a long way. As I develop my own coloring skills, I'll absolutely be adding more content about this.

How to draw a lily… There it is!
I hope you liked my tutorial! Please leave me a comment. Was it understandable? Did the explanations make sense? Did I explain too much? Anything you can think of, I'd love to hear it. I'm always trying to get better!
Until next time, happy drawing!
Best wishes,
Michael
how to draw a lily
Source: https://thedrawingjourney.com/how-to-draw-a-lily-lines-of-simple-beauty
Posted by: longneckerfroor1994.blogspot.com
0 Response to "how to draw a lily"
Post a Comment